

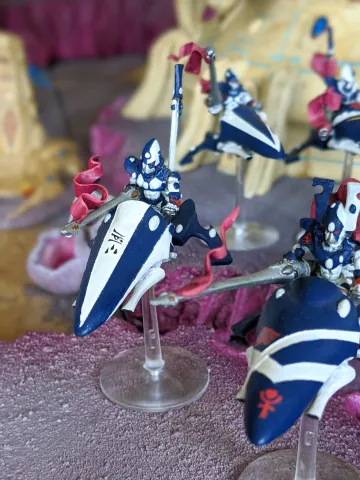
How to Make DYI Banners for Your Models, (or “How to Make Those Fugly 90s Shining Spears that GW Still Sells Look Cool)

The picture above is of my converted shining spears with some easy-to-make pennants added to their lances. I lead with this photo because I thought it was the most engaging one to come out of the project, but I actually think that to do-it-yourself pennants have even more to offer if you are using those fugly official GW shining spears, which really need some help in order to look good alongside our other units.
A lot of new players who feel drawn to Craftworlds are immediately infatuated by the sleek elegance of the models in the eldar line. Even though many of these sculpts are over fifteen years old, I think they are still among the nicest in the game. I have gotten a number of notes from readers mentioning how particular units, (especially wraithguard, windriders, and various vehicles,) got them excited about taking up the cause of our beautiful and doomed aesthetes. Ironically, one of the best units available to the faction also happens to be comprised of models that look stiff and dated compared to pretty much everything else on the table.
I love what the original designers were going for with those late 90s shining spears that GW is still selling: chivalric space elf cavalry with armor inspired by 14th century jousting harnesses. But it hurts that our windriders- who are basically just mounted militia- have cooler looking bikes and more athletic poses than our allegedly elite aspect warriors. As a result, shining spears are probably the most popular candidates for third party replacements and/or conversions. In my greatest modeling breakthrough of 2020, I have discovered a way to make my old GW shining spears look a whole lot better: I have added lance pennants that appear to be whipping dramatically in the air as the riders tear across the battlefields of the 41st millennium. This small addition gives these otherwise stiff and inert looking sculpts the appearance of dramatic motion.


Adding pennants is cheap, relatively easy, and you can upgrade a whole squad of them in a single evening. The key is this product:

A moldable plastic that is non-toxic, really easy to work with, and that can be used to great effect even by a person with no special artistic talent. My wife writes geeky cookbooks for a living, and she ordered some of this stuff to build props for her photography. While she was playing with it for the first time, she said, “I bet you could use this for your eldar models. Do any of them need capes or something?” I was a total doubter initially. Actually trying to sculpt anything to add to a model seemed wayyy above my paygrade, but when I saw her twist a piece of the plastic into a little ribbon I realized that she might be right. I remembered the autarch skyrunner that I bought from Ghost Miniatures about a year ago and just how much the little plastic lance pennant brought the miniature to life.

A few hours later, I was marveling at my much improved shining spears.


Here is how you can do the same thing to take your gifted but aesthetically challenged warriors to the next level:
Step 0: Order a bag of this magical moldable plastic from amazon and wait for it to arrive while dreaming of the wonders you will create.
Step 1: Heat up two half cups of water to boiling and pour into a small heatproof mug.
Step 2: Add about a teaspoon of plastic beads and let them sit until they turn clear. This should take less than a minute, but might vary based on brand. (I used the InstaMorph in the linked image above.)
Step 3: You now have a lump of warm moldable plastic in the bottom of your mug. I used a wooden skewer to fish it out of the boiling water, but anything will do- it’s just unpleasant to plunge your fingers into near boiling water. Pluck the plastic from the water and pinch off a small piece; (return the rest to the hot water for later.) Squeeze the small piece flat and pinch it into a flat triangule, roughly the shape of your desired pennant—don’t worry if it doesn’t look quite right yet. (It should be very thin. This stuff can be turned nearly into cling film- don’t go quite that far, but it should be thinner than what typically passes for cloth on a GW model.)
Step 4: Use kitchen shears or sturdy scissors to trim the edges of your proto-pennant, just to tidy it up a bit. Make sure you also trim the base (the widest end) to help it neatly fit onto your model.

Step 5: Holding the pennant by the base, submerge the fluttery end of the pennant into the boiling water until it turns clear. (Just a few seconds.)

Step 6: Take the pennant back out of the water and bend side to side into a dramatic ribbon shape. Then take the tail end and give it a quarter twist in one direction or the other to give more of a sense of movement. When you are happy with the overall shape, let the pennant cool


Step 7: To finish, hold it by the tip and dip the base of the pennant until it turns clear. While still hot, press onto your model wherever you’d like it to live. Hold for a few seconds until it sets. Now remove it from the model.

Step 8: Prime, paint, and glue as you would any other model piece.
Congratulations. You have just added a super cool pennant that has transmuted your fugly biker from the 90s into the dynamic chivalric badass that it was always meant to be.
Tip:
Depending on the scope of your project, you’ll likely need to refill the hot water occasionally.
Once you have the hang of the pennants, you should be able to also make capes, half capes, and a variety of cool stuff that I have not thought of. (I would love to see a Space Marine player make some purity seals this way.) The capes in particular offer a great way to distinguish your exarch or “upgrade” an additional model to an exarch in order to run smaller squads, (which will probably be the best way to use shining spears in 9th edition.)
If you have questions, or you want to send me a picture of what you made, just use the contact link at the top of the page.
Best of luck, and happy crafting. -Brent
DISCLAIMER: those are my wife’s hands in the pictures. I could not take the photos while I was holding bits of plastic. Her hands are nicer than mine anyway.